
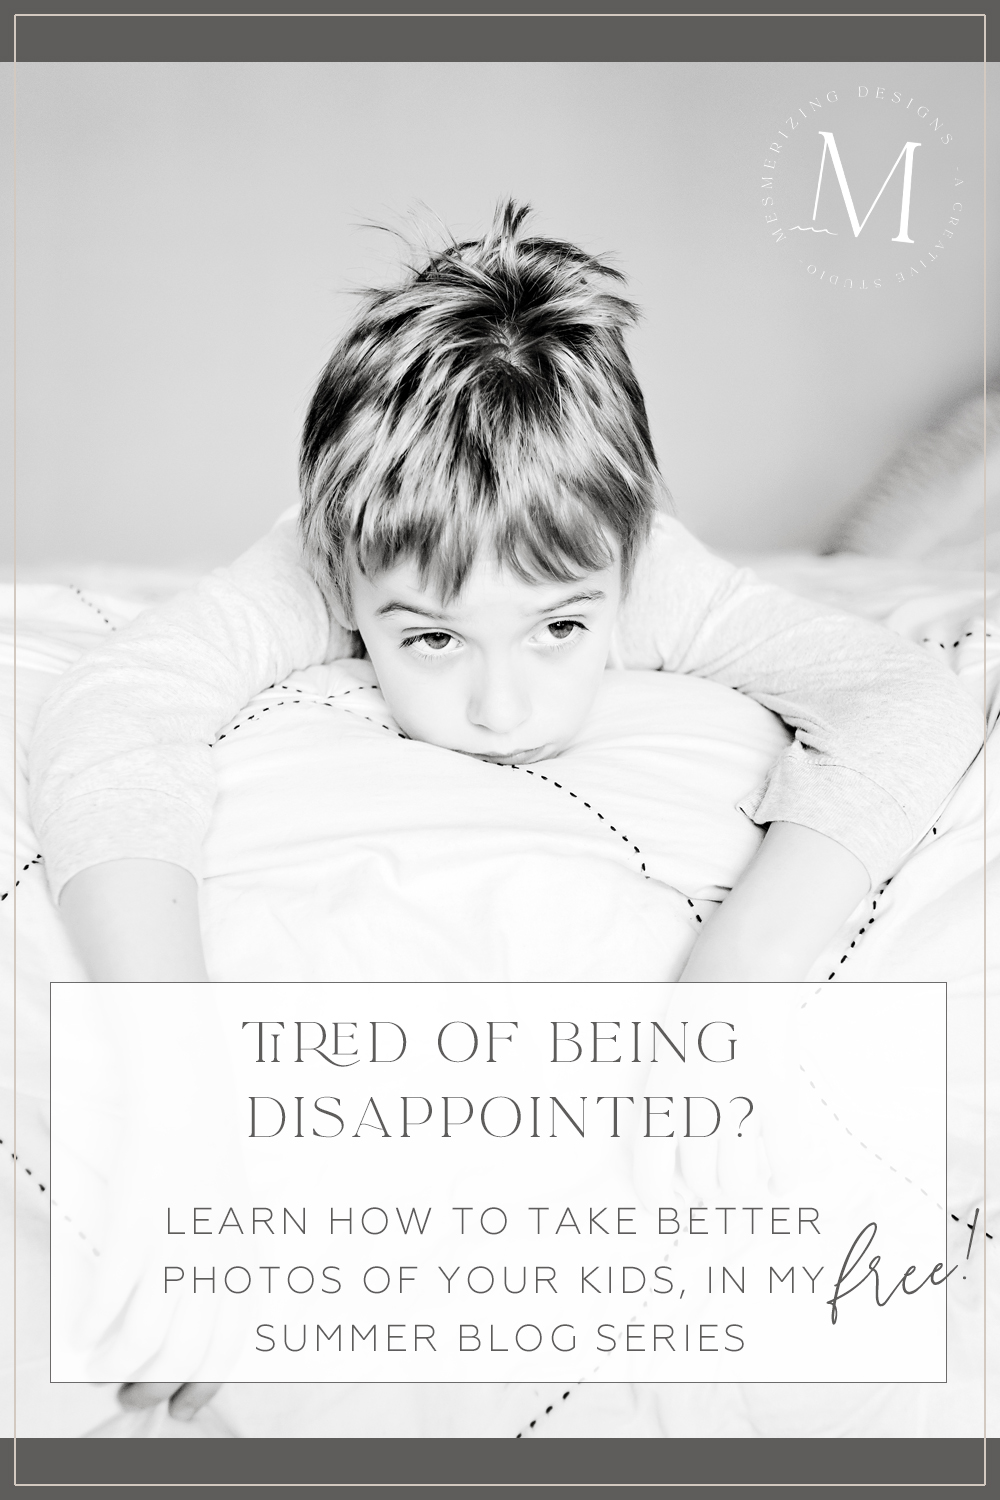
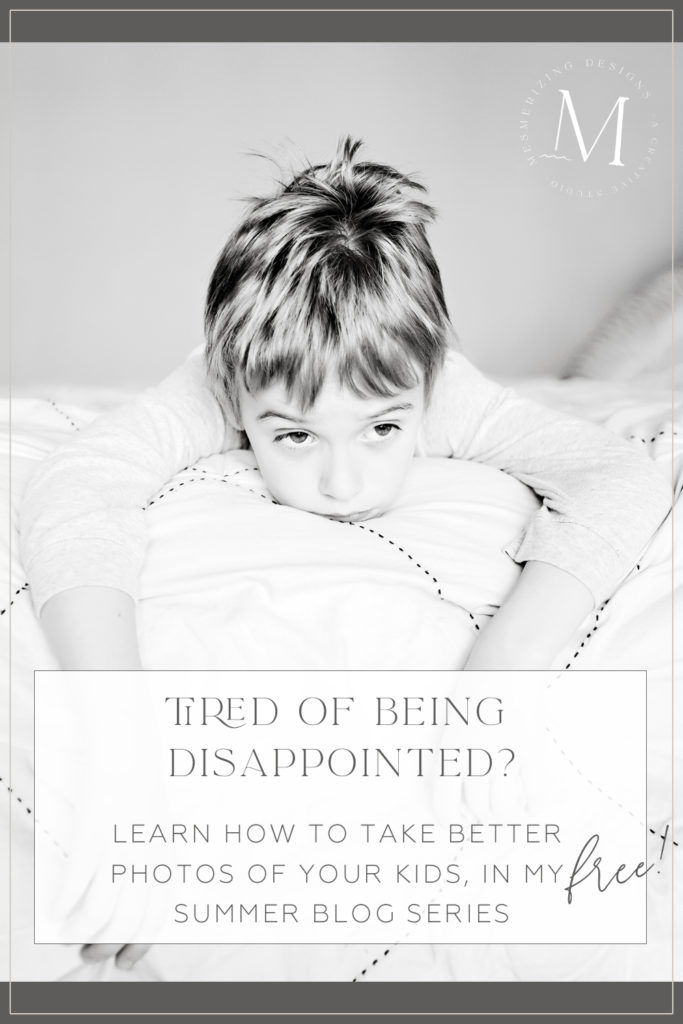
Learn How to Take Better Photos of Your Kids | Week 1
Online Photography Class
A complete guide to using your DSLR camera to get better photos of your children. Learn photography basics + more! Aperture, Shutter Speed, and ISO
Lesson One
REVIVED FROM SUMMER 2015
Here it is! The first post in my little series that will teach you how to use your DSLR camera!
Feel free to pin the lessons, so you can always look back on them, and share with your friends! Make sure you come back every week for the next 10 weeks too, to get all the info, and definitely let me know whenever you have any questions! I look forward to seeing your images!!
Ok, bear with me for this first post, it is going to be really really long, haha – I want to cover all the basics right off the bat, so we can get to the good stuff asap! But I promise I won’t overwhelm you like this in the weeks to come! lol
I hope you enjoy the series :) Happy clicking!

So, here it is, a fun little manual on taking photos of those kiddos, without a filter. I am hoping it will open you up to a whole new world, where your photobook of memories truly reflects the magic you were surrounded with when you took each and every photo.
You know, that moment when your child smiles back at you while skipping across the lawn, with that dirty face, which under any other condition would be considered gross? But, since it’s your baby, and the glow from the sun is dancing through their hair flawlessly, it’s, I don’t know, not gross at all; it is in fact, perfect. Ya, those memories.
When you are left with a photo where that beautiful sunlit hair appears dull, and the magic of that special moment just isn’t captured correctly, it can be heartbreaking. It becomes a photo in a junk drawer, or in today’s world, a photo in a file on a computer that is never shown, when it should have been so much more.
It’s not just a click. It’s a memory.
A little about me.
I learned the basics of photography in High School, and I still remember how hard it was for me to understand the concept of all that silly shutter speed and aperture stuff. I would take my film camera all over Northern California and capture what I saw as beautiful, and then in the dark room my images were far from that. I had been taught the basics, but I just wasn’t getting it. I remember hearing my teacher talk about how he could look at a scene and thing f/2.8 @ 1/125th. I also remember thinking he was crazy! lol Since then I have always had my camera in my hand, and while I did take photography classes in school, I honestly don’t think I truly learned until I got my first Digital SLR. There is just something to be said about practice with immediate results. I had my poor husband drive me all over San Diego so I could take photos of everything! That trial and error process taught me more than I had ever learned in school.
When my son, now 13! (ahhhh!!), was born I finally knew I wanted to be a portrait photographer. I loved landscape, and had played around with portraits many times before, but there was just something so special about capturing love and family, I was done for. I grew my portrait business from there, and for many many years it was my heart and soul.
Some of the information I am going to give you might seem a little repetitive or boring, but I speak from experience, those basics cannot be passed up! If you want those amazing images, it takes work. I want you to know how your camera thinks, and while that comes with practice time too, that practice can only take place once you have started the learning process from the beginning.
So, here is the beginning, are you ready for it? (I bet after all that gabbing you are, lol) I sure hope you are!
Read your camera manual.
Yep, let’s get that out of the way, sorry! It needs to be said. I can teach you all about the technical and artistic side of photography, but I cannot write this manual for every single camera on the market, and we all know there are too many out there! I can teach you when to use that depth-of-field preview button to your advantage, but I cannot sit here and tell you where yours is, since I do not have your camera in my hand. But guess what?! Your manual can! I know manuals get tossed aside when ripping through packaging, or maybe if they are luck, glanced at for a few minutes, but in this case that is just not enough. Before continuing on with this guide, you need to read your camera manual. I do know they are hard to read, boring, and very little of it will even make sense right now, but can you just go grab it? Feel free to bookmark this page, and come back to it with lame camera manual in hand. Oh, you don’t have that old thing any more? No worries, it’s online, free even! Go ahead, Google it.
Ok, now you have a lot of information in front of you, I know it all looks a little scary. Don’t think about it. Just read your manual with your camera in hand so you can push every button as you learn where they are, and what they do, and when you’re done with that, this guide will help you make sense of it all. But please don’t think my posts will teach you everything in your manual, remember I cannot tell you where your buttons are, I can only help you know why and when to use them. So, go ahead, go read that little confusing book now, then come running back to me, I will be here, promise!
Know your camera
A camera consists of 3 major things, a light tight box that stores a light sensitive device called the sensor, a lens that magnifies and focuses the image onto that sensor, through a hole called the aperture, and a shutter that opens and closes when you press the shutter release, opening the sensor to the light.
To make a photo look right, we have to expose the sensor to the right amount of light. If we don’t expose the sensor long enough, the photo will be underexposed, or dark. If we expose the sensor to light for too long, the photo will be too bright, or blown, or overexposed.
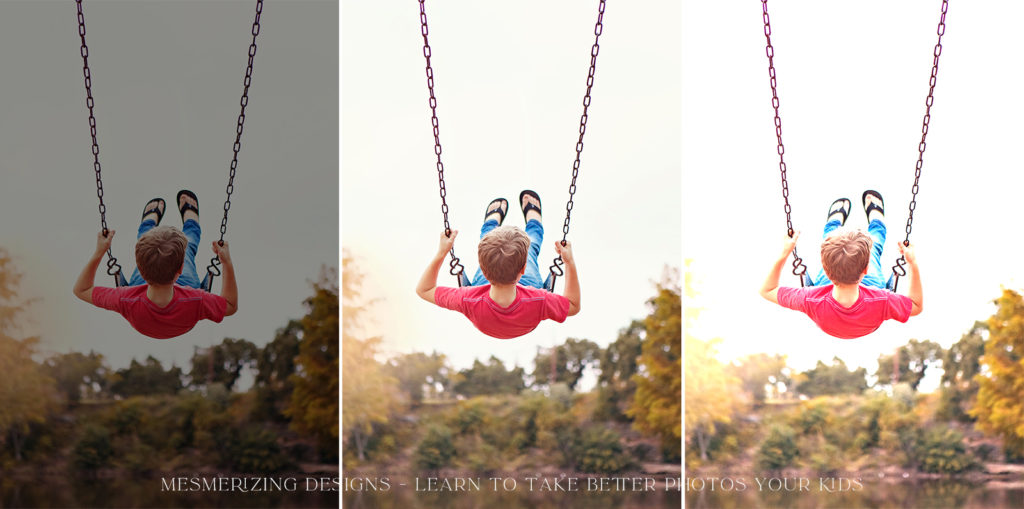
Here, the first image would be considered underexposed, the second image shows the correct exposure, and the third image would be considered overexposed.
Your camera will have at least these 4 modes – Some of this might not make sense yet, but I want to put this here so you know what the different modes mean, and then you can reference back to it later if you need to.
“Green Box” or “Fully Automatic” – Photographers call this Panic Mode – this is probably the mode you use most often, but what I want you to understand about auto-mode is that your camera takes the whole scene into consideration to expose your image, and it cannot think like a person. An easy way to describe this is to think back to beach photos that you have taken of your kids. The camera sees this huge bright beach, white sand, and sunny sky, with a tiny little person. The brightness takes up way more space in the image than your child, so it exposes for that. And then what happens? Your kiddos come out super dark in the image. Your camera did what it was supposed to do, properly exposed the entire image, but it did not think like you, and properly expose for your cute little kiddos.
A or AV – Aperture Priority – with this mode you set the aperture, and the camera picks the shutter speed, good thing about this mode is tat you can the aperture to control your depth of field and the amount of light you let in, and not worry about anything else, but the bad thing is that your camera could easily drop your shutter speed to give you camera shake, and make your photos blurry. With aperture priority mode you have to keep an eye on what your camera is doing. If it is giving your photos a speed of like 1/50th, then your photo will have blur.
S or Tv – Shutter Priority – with this mode you choose the shutter speed, and the camera chooses the aperture. The great thing about this mode is that you can choose your shutter speed, so if you set it faster than 1/125th or so, you won’t have to worry about your image being blurry. But, you will have no control over your depth of field. I think personally this is better than aperture priority mode for learning, because while you might not have control over your depth of field, at least you will have photos that are not blurry by controlling your shutter speed.
M – Fully Manual – this is obviously the best mode once you completely understand how your camera works, because you can control everything your camera is doing. This is you taking the photo, not your camera. Always remember that your camera is a tool, and it cannot think like you. It has no idea what you want from it, and learning to use this tool in full manual mode is the only way you can tell it exactly what you want, and have it produce perfect results every time.
Imagine using your washer machine on automatic, just throw a bunch of stuff there, and only one button – start. Your clothing would come out clean, sure, the washer would do its job, but some of it might get destroyed. Imagine not having the choice of cold or hot water, the delicate cycle, and so on. You would get decent results, but not exactly what you wanted. Using your camera on auto is very similar. Sure, sometimes your photos come out great, btu that scene situation just happened to be set perfectly for how your camera works, and I know for a fact you won’t get that lucky all the time, or even half the time. You need to tell your camera what to do, when to do it, and understand all the why’s.
It is hard to get to this point though, trust me, I know! Lot’s of learning and practice, but I promise once you get there you will never look back! The camera I own now has never once been off full manual mode, in years, and that is the way these DSLR cameras are meant to be used. The only way you will truly get what you paid for. Photos like this are nearly impossible without M mode …

The stale basics
You had to know this section was coming. might as well get to it, right? This next portion is going to be all those boring basics. Since you have a DSLR I hope these terms sound familiar. You may have even attempted to learn them before, or honestly, you may even know them very well. I hope that I can teach you about them in a new way though. A way, that if you have tried and failed, ends that battle, and leaves you feeling encouraged and ready to take on that pesky manual mode. Even if you already think you know what is coming, please still read through it, you might hear something explained differently, and it just might help you understand even more, which, of course, is never a bad thing! Again, bare with me through the colorless part of the journey. I know it’s tough, but in the end it will be worth it, and I will try and throw in something shiny here and there.
Aperture
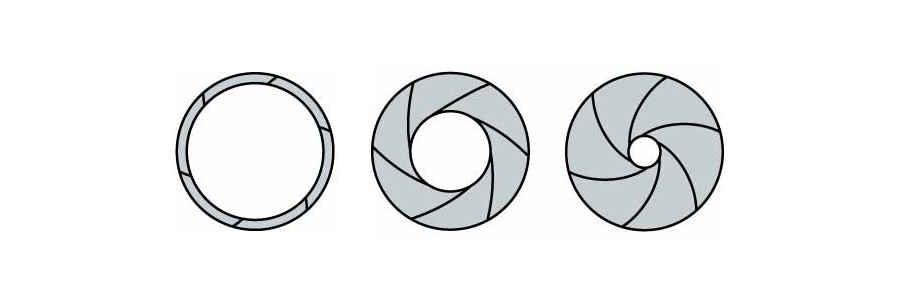
Aperture is the term used to describe the hole in the lens that light travels through to reach your camera’s sensor, and it is referred to as F-stop, example f/2.8. It gets a little confusing with this, but the smaller the number, the bigger the opening. There is a wide range of aperture settings, and these depend on the actual lens that is on your camera.
The lens that comes with your camera is typically f/4.5 – f/5.6, and this means that at the wide end of your lens’ length (probably 24mm or so? – each lens is different) your aperture will only open to f/4.5 and at the shortest end of your lens’ length your aperture will only open to f/5.6. Prime lenses are lenses that only have a fixed length, so like a 50mm, and these lenses will go wider, like f/1.4. Typically, the larger the aperture, the more expensive the lens.
Here is an example of some different apertures, and these make it easy to see the difference in how wide your lens is opened at each different F-stop. When you have your aperture as large as it can go (lowest number) that is called “wide open”. So you will hear people say I shot that “wide open” You can also visualize how your aperture affects the final image. If you are shooting wide open, a lot more light pours through, onto your sensor, in less time, than if you are shooting “closed down” at like f/16. So, in turn, you need a longer shutter time to get the same amount of light, does that make sense? You would need to leave that small hole open longer (shutter speed) to get light through.
When your aperture is open wide, more light hits the sensor than if you had it closed down, so you can shoot with a faster shutter speed. More light gets through the larger hole quicker, so you need it open for less time total to get the same result as the smaller hole.
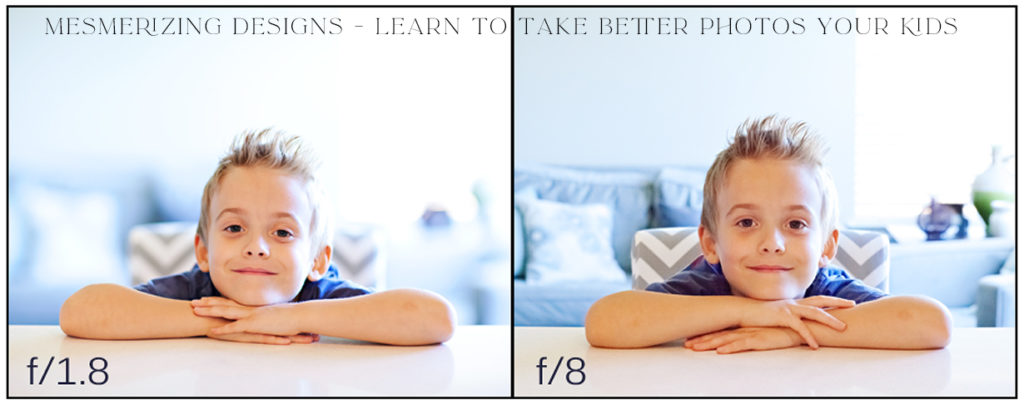
The aperture also controls your depth of field, which is the amount of your photo in focus. When you are shooting wide open more of your photo will be blurry, and when you are shooting closed down more of your photo will be in focus. Here is a photo example to show what the aperture does to your depth of field. So, when I am shooting one subject, I like my background to be blurry, so my subject pops, so I will shoot about 2.0 – 2.8, but when I have things in the background I want in focus, it’s better to shoot with an aperture above 8.0.
The clutter in the background of the following image is completely across the living room, so knowing that, you can really see how much depth of field is affected by the aperture change …
This is a great practicing point!
I would like you to shoot some images around your house in the Aperture Priority mode. I want you to move your aperture around a lot, go wide open, close down completely, and everything in between. I also want you to pay attention to what your camera does with the shutter speed as you change your aperture. It will probably drop it down really low if you are in a dark area when you close the aperture, don’t worry about that for right now, just pay attention to what it does, and remembering what you learned about aperture, try and realize WHY it was doing that. Like I said, in darker areas when you close down your aperture it will probably make your shutter speed really slow, and that makes sense right? If you look at the aperture samples from above, and your F-stop is f/11, then it would need to hold the shutter open longer to expose the image, right? In the next section you will learn about shutter speed, so that might not make perfect sense right now, but once you have gone through these first basic lessons, that should start making a lot more sense :)
Shutter Speed
The shutter on your camera controls the length of time the shutter is open and allowing light to pass through the aperture onto your image. I think of all these concepts, shutter speed is the easiest to understand. The longer you leave your shutter open, the more the light will pass through onto your sensor, resulting in a brighter image. Shutter speeds can vary from small fractions of a second to several seconds, and even hours on some cameras. Since you are working in fractions of seconds, it can get a little confusing, so try and remember your basic math when adjusting your shutter speed, like 1/50th is larger than 1/200th. So 1/50th is keeping your shutter open longer than 1/200th.
Here is where motion blur comes into play as well. Remember when I said I can only shoot at about 1/200th, because my hand shake. So, when my shutter drops below that, to say 1/125th, my camera is picking up that teeny tiny motion, causing blur in my photo. Every person is different, I hold a lot of gear, and it gets very heavy one handed, and with time I learned my safe shutter speed. I urge you to take some time and find your safe shutter speed as well. It will probably be around 1/125 or so, I suggest start by using that as your safe number and with time you can adjust from there.
Blur does not only come from your camera shake, it can be from your subject or background as well, known as motion blur. If your kiddo is moving faster than your shutter speed, your photo will be blurry. Just keep that in mind, and play around with shutter speed to find your “safe number”.
On a side note here too, make sure you have read through your camera manual to find out how your shutter speed is displayed on your camera. Some cameras show the fraction time, like 1/200 just as a “200” and that can cause confusion when learning. So make sure you practice with shutter speed knowing exactly what your display means.
Below is a great image showing that slower shutter speeds show motion (which is typically not what you want with photos of your kids, but can also be a fun trick in your toolbox!) The shutter speed for this photo was 1/15, you can see his foot is planted perfectly in focus because it was planted there for that 1/15th of a second, and although that seems super fast, you can tell with this image that the camera picks up every bit of motion, and kids move very quickly! haha
Combining the two | Aperture + Shutter Speed
So, now knowing how shutter speed and aperture work, can you see how they will play together?
Imagine pouring water from one bucket to another, if you are pouring it through a funnel into the bucket, it will take you a lot longer to fill the bucket, correct? So, in that scenario the light would be the water, and the funnel would be your small aperture (say f/16) and the time it takes would be your shutter speed, which would need to be long. But, if you poured the water straight from one bucket into the other bucket it would pour in a lot faster. So in that scenario your aperture would be the pouring bucket which is a lot larger than a funnel, and the time to fill the second bucket would be a lot faster. The wider your aperture is, the less time you need the sensor open to allow the same amount of light to pass through.
But, don’t let yourself forget, your aperture controls your depth of field as well. So, if you want a lot of your image in focus then you have to sacrifice the time your shutter is open to be able to use that small hole. With my work, I typically shoot wide open, and now that you know what that means, the reason why should make sense. I only need a small portion of my image in focus with one subject, and in turn I get to shoot with a faster shutter speed. now, when I shoot families, with more people, I need more of my image in focus, so I have to sacrifice some shutter speed to get the exposure I want.
I am going to throw something in here about depth of field real quick too, even though it should be in the aperture section. The way your depth of field works is on a plane from your camera point, so imagine the subjects are the circles that you want in focus as you look at this image I created …
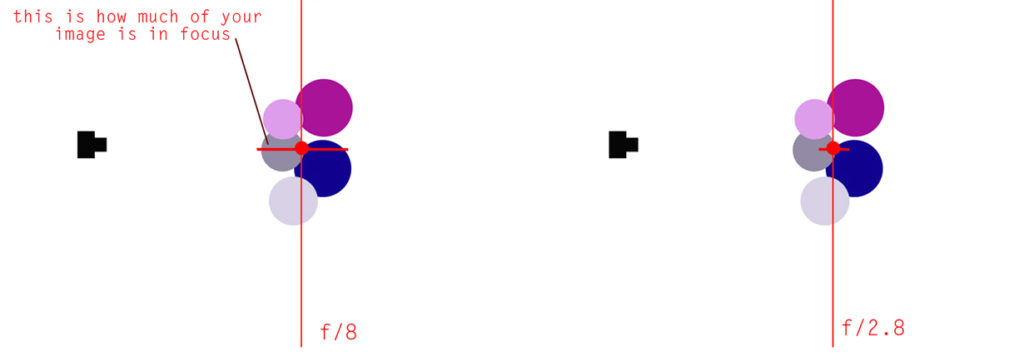
In the first chart you can see the red line coming out of the red dot would be your focus depth of field. Imagine the red dot as where you put your focus. Second is what happens when you use a small aperture with a larger group of people. The front or the back will not be in focus, because you can see by that little red line, that it does not reach everyone. Your depth of field is much smaller.
Below is a photo example of this in action. Two completely different photos using the same camera settings, including aperture. In the photo on the left, the subject is not on that focus plane, (the tip of his bubble gun) he is behind it, so using the larger aperture makes him very blurry. In the photo on the right, my subject is along that focus plane (still his bubble gun) so he is pretty much completely in focus.
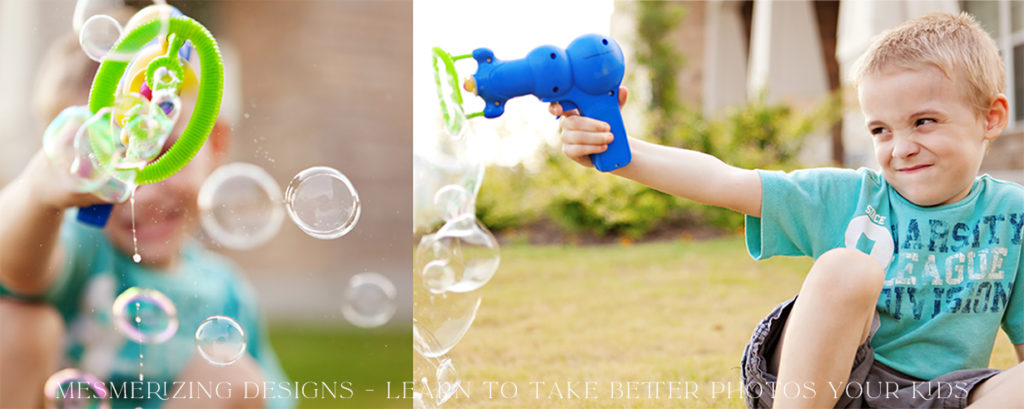
Same settings, same kiddo, same background, same toy, same everything, and only seconds apart, same focal point even! I just asked him to point his toy in a way that brought it toward the camera, and then away from the camera. Completely different images!
ISO
Ok, so now I am going to confuse things just a tad more, with ISO. ISO is the third factor to correct exposure, so now that you somewhat understand aperture and shutter speed I am throwing in this twist. The ISO of your sensor measures how sensitive it is to light. Do you remember back when all shot on film, and you could buy 100 film, or 400, or 800? And the little boxes always said that 100 was great for sunny outdoors, and 800 was for inside? Well, they carried that same concept over to digital, and gave you the ability to change the ISO of your camera’s sensor. So, the higher the number – the more sensitive it is to light. That’s why 800 was for inside, right? If it’s more sensitive it will pick up more light with the same exact camera setting that 100 would. This is excellent news! And I bet once you learn your camera and go-to settings you’ll be like me, and change that ISO the most out of anything else. If I am inside, and it’s kind fo dark, but I don’t want to drop my shutter speed any lower than 1/125 (because my image would be blurry) and my lens is already wide open at say f/2.8 then what else can I do?? I can add more light to the scene, which isn’t always possible, or I can make my sensor more sensitive to the little light that is already there, by cranking up that ISO! Now, of course there is a downside, or that would be too easy! haha The higher you go with your ISO, the more noise you will have in your images. Dang. Noise is grain, artifacts, and bluriness – blah, right? So, you have to learn your camera’s ISO “comfort zone” If you have an older camera, it is going to be lower unfortunately. Technology is getting better and better, and one thing that we are benefiting from is better noise capabilities. If your camera is newer, this is a very nice benefit!
I feel the same way about auto ISO as I do anything else auto – it will work, but it’s not you controlling the camera, the camera is doing what it wants. Why let it do that? I think you should learn to control your ISO just like everything else, but the good news is – at least it’s the easiest one!
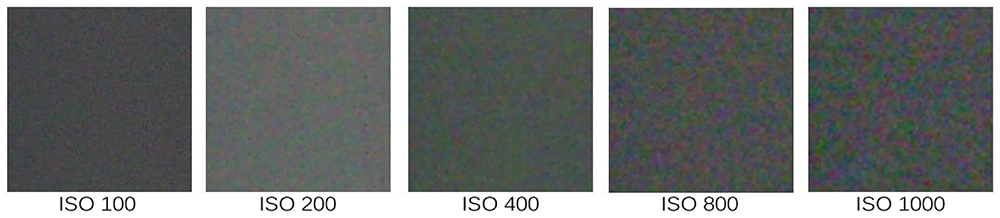
A great practice point here! Put your camera in manual mode, at f/5.6, with a shutter speed of 1/125, and then take a photo with ISO 100, then ISO 400, and ISO 800, then all the way to your camera’s limit. Every camera is different. Then I want you to look at each photo zoomed in to 100% and see how much noise you have. (Of course also take note of how that change is affecting your exposure!) The good thing about noise is the smaller the photo, the less you will see it. So if you are at birthday party inside, and only going to use those images as 4×6’s in an album, or small sizes online, then crank up that ISO to get the camera settings you want, who cares right? You will never really see it. But, if you want an 8×10 or 11×14 or larger, then watch that ISO, and don’t let it go over your camera’s “comfort zone”. While playing around with the ISO on your camera, take note of how high it can go before you really see that noise, and just remember that number. Again, every camera is different, so it’s all about playing around with it, practice and study, to learn what works for your preference with your specific camera.
Here are some zoomed in samples of what I refer to as noise, with some different ISO options.
Ok, I feel like that is a great stopping point – phew that was a lot of info! lol I hope it all starts to make sense for you, and is helpful! Read and re-read all you want, and please share with friends.
Next week will be all about Focus – then week 3 is using Manual Mode – I hope you’ll keep coming back :)
xo, jen
save / share this post
TURN HEADS WITH DESIGN THAT RESONATES
Branding & Web Design
Establish or refresh your brand’s visual identity with entirely custom designs that grow your business.


Template Customization
Tailor your chosen Showit website template to serve your very own business style and goals.
Get the Details
Learn More


